Forking, Creating Branches, Pull Requests, and Merging in GitHub: A Simple Guide
Introduction:
When you want to make changes to a code on GitHub without disrupting the main version, creating branches is crucial. It lets you work separately without any worries.
After you finish working on a branch and want to add your changes to the main code, you need to request the owner's permission. This is done through a Pull Request.
What is forking and why is it important?
Forking is like making your copy of a repository. It's important because it lets you try things out, make changes, and contribute to projects you like. It's a way to be part of the open-source community.
How does forking work?
Forking is easy. Just click the "Fork" button on the repository's page. This makes a copy of the repository under your account. You can then explore and change the code without touching the original project.
Contributing back:
When you're happy with your changes, you can share them with the original project. You do this by submitting a "pull request" to the project owners. This lets them know about your proposed changes. They'll review your work and, if everything looks good, add your changes to the original project. Your contribution becomes part of something bigger
What is a Pull Request?
You can't directly add your changes since you don't own the code. Instead, you have to ask the owner to review your work and allow it to be merged into the main branch.
It is always a good practice to create a new branch make your changes there and start making changes in that branch.
How does it work?
Once the owner reviews your changes and approves them, they can merge your work into the main code.
Let's see how it's done:
To create a branch, make changes, send a Pull Request, and merge it, follow these steps:
Clone the GitHub repo to your local machine using the "git clone" command:
For example, you can use
"git clone github.com/ScaleupInfra/terraform-aws-s3-bu..".
Change into the repository directory:
For example, use "cd terraform-aws-s3-bucket".
Note: the command to list all the branches is "git branch -a"

The * sign in this shows in which branch you are currently in.
For example, the above picture shows that I am in the main branch.
Create a new branch named "tushar" using the "git branch" command:
Switch to the newly created branch using the "git checkout" command:

Make your desired changes or add your work to the main files.
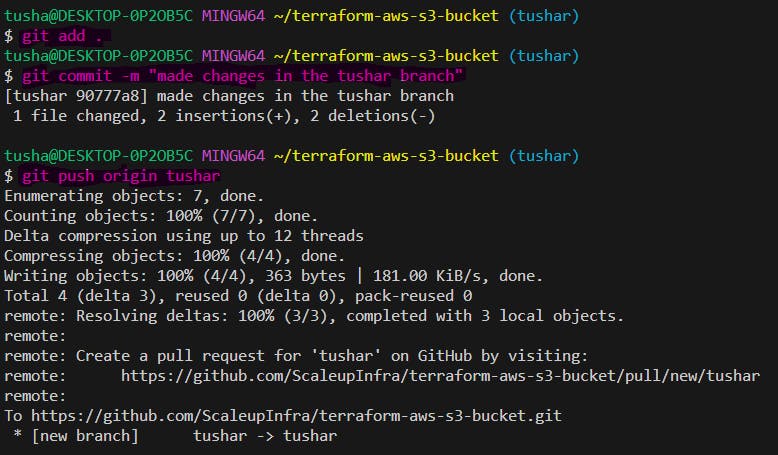
After making changes or adding your work, add the modified files to the staging area using the "git add" command:
Commit the changes with a commit message using the "git commit" command:
- Push the branch to the GitHub repo using the "git push" command:

Visit the GitHub repository in your GitHub account and go to the branch you just pushed.
You will find an option to create a pull request. Click on it.
Provide a title and description for your pull request, then submit it.
Wait for the repo owner to review and approve the pull request.
Once the pull request is approved, it can be merged into the main branch directly on GitHub.
Click on the option Compare and pull request.
Write a description of your change and create a pull request.
Sometimes, conflict may arise in your code before merging. so resolve it and a conflict is not the same for every code you have to troubleshoot it by yourself.
After resolving the conflict your commit merge option will appear. Once you have checked the code, click on the commit merge option.
And that's it your code has been merged.
Conclusion:
By creating branches, sending Pull Requests, and merging changes in GitHub, you can collaborate effectively while keeping the main code intact. This workflow allows you to work on your version of the code, propose changes, and have them reviewed before integration. Follow these simple steps and provide clear descriptions when submitting your pull requests.

